After cooking
Remove pot from hot stove burner or oven.
Place hot pot on cold stove burner, pot-holder, non-metal trivet, dry folded dish towel or wooden cutting board. Do not put pot directly on the countertop or in a metal sink.
If you empty the contents of the pot, and steam is still being produced, the pot is too hot.
Add about one cup of room temperature water to the pot to help absorb some of the heat. Steam coming from an empty pot is drying and can cause cracking.
Also, adding water to an empty pot makes the pot easier to clean.
If food remains in the pot.
- Let the food cool.
- If having the same food at the next meal, and there is no meat which can go rancid, I will simply leave the food in the pot with the lid on. Clay has a way of keeping leftovers fresh – without refrigeration.
- If the food will be going in the refrigerator, I usually put in in a glass bowl because my clay pot will be needed for other dishes. However, food can be stored in clay in the refrigerator.
Washing
Hand wash
Hand washing clay is recommended. Do not use soap – it would get into the porous clay. Most of the time, I have no sticking and simply use plain warm water.
You can also use baking soda:
- Wet the pot.
- Sprinkle with a small amount of baking soda.
- Scrub it around.
- Rinse off.
Stubborn spots or bad sticking

- Add 1-2 cups of warm water to the pot.
- Sprinkle with about 1/2 tsp of baking soda.
- Wait 5-30 minutes – or even over night.
- Scrub (with your clay pot scrubber) or scrape off (with the edge of a spoon or your fingernail).
Notes
- As long as the pot is fully seasoned, you can let water sit in the pot overnight, and wash the pot in the morning.
- Because clay is porous, water starts soaking into the walls, and this starts separating the food from the pot.
- The discoloration may or may not immediately come off. As long as the residue is off, all is well.
- If the spot remains, it will likely fade over time.
- If the pot is not fully seasoned, don’t soak for too long – a water logged pot can be problematic for mold and cooking.
- Baking soda lifts off spots and removes odors.
- Vinegar is only used for cleaning mold. Use it straight, but quickly rub and rinse with water.
- When cleaning a yogurt pot, do not use vinegar – it’s acidic and an alkaline environment is best for the bacteria.
Water temperature
Dairy cleans best with cold tap water. Other cooking cleans best with warm tap water.
Pot scrubbers

Use a pot scrubber that is solely dedicated to your clay pot. It needs to be abrasive enough, yet not too abrasive. Miriam prefers natural scrubbers with natural clay pots – such as gourd loofahs. However, sometimes she uses a hand held to use a dish brush with strong nylon bristles.

Drying
I use to dry my pot upside down on my metal dish rack. I was careful to keep other items away from my pot, however, I got a few minor chips in the rim of my pot. I now lay my pot upside down on a dish towel.
Air drying
Usually all that is necessary.
When to dry with a towel
Simply air drying is fine in most cases, but if room is very humid and/or someone has cooked in the pot 2-3 hours, then wiping down with towel expedites the drying process, especially when new, and reduces or eliminate mold growth. Even when pot has been holding yogurt for a week it may be saturated with moisture, in that case wiping down expedites drying and helps with mold issues.
MEC
Stove top drying
When is it necessary?
- The pot is water logged and you need to cook with it soon.
- You need to store your pot for awhile and your house is humid.
- If you pot is not completely seasoned and you will not be using it again without the next day.
Instructions:
- Put empty pot on the stove (no lid).
- Gently (on a very low setting) heat the pot for 5-10 minutes.
- Stop when the top rim gets warm.
Sun drying
My favorite way…. on nice sunny days, I like to put my pots outside to dry for a few hours.
Summer is almost coming to an end! Get your MEC pots and pans some sunshine before the cooler days set in. It is a time-honored belief that these kinds of pots reflect Vitamin D from the sun into your food after placing them outside under the hot sun for some time.
Why is this the case? Your pots absorb and retain the invisible UVB spectrum of light from the sun — just like the “earth” absorbs these rays and then radiates it out to give light and life. These clay pots originally come from the earth; as a result, they retain some of the properties of the earth! From there, your pots radiate sunlight into food while cooking to increase the production of pre-vitamins like D3 in your food. This causes Vitamin D to be synthesized for your cells and your organs!
On a regular basis, even on colder days and winter, keep your pots as close to the windows as possible when storing to continue receiving this wonderful benefit.
MEC
Storing
Storage tips

- Make sure pot is thoroughly dried before storing
- Store with lid removed (or at least cracked).
- Use a well ventilated place which is not too damp or too dry.
- Have air on all sides of the pot.
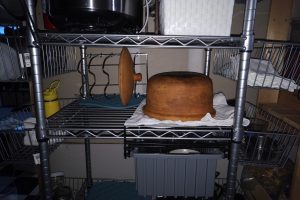
- It’s best to store pot upside down – gravity helps the pot reset from cooking?


Miriam has a pull out wire rack in her cabinets. It’s perfect for storing pots upside down on and getting good air circulation – a wire cookie rack or wire trivet also work.
However, Miriam says most of her pots are in constant use and rarely make it to the storage cabinet. She simply leaves them out (right side up) her her gas stove.
If necessary, the pots can be stacked one inside the other.
Storing in damp locations
Occasionally (about every 2 months), it’s also a good idea to dry your pots on the stove top at the lowest setting for 5-10 minutes or until warm to touch on the outside. For some reason, kitchens with electric burners have higher humidity levels than kitchens with gas stoves.
Storing in dry locations
Occasionally (about every month) oil the outside of your pot.
If you can spare the time:The water in my pot smells like mildew. I cleaned it w/baking soda on the outside, as usual, & hand-washed against walls w/bare hand, then rinsed.It was ok for a few days, so I washed inside & outside w/baking soda, and gave it a hand wash w/small amt Grandma’s Lye soap & rinsed it a long time. It was ok for ~4 hours, but mildew odor was back. After cleaning it that time,I filled it w/tap h2o, thinking I should let the water drip thru to clear out any residual mold &/or soap, but after… Read more »
Recommended Solution: – Discontinue use of lye or chemically-laden soaps. Grandma’s lye soap is made from beef fat that contains toxins, and it also has additional chemicals that could cause the pot to push it out of its walls and form mildew on the surface to break it down. – Wash the pot thoroughly with turmeric powder on the inside and out. Use plain turmeric—it’s a natural antifungal that helps eliminate and prevent mildew, especially on the exterior. You can wash the inside of the pot, but typically you don’t have to wash the inside of the pot because the… Read more »